The ability to translate categories and custom taxonomies in WordPress is essential for any website looking to go multilingual. If you’re serious about multilingual SEO, then translating taxonomy slugs is a must as it will help your translated content rank in multiple languages.
This however is not always as straightforward as it should be. Different WordPress translation tools have different approaches when it comes to translating slugs for categories, custom taxonomies, or terms. It’s quite easy to get confused when joggling with multiple translation interfaces for different types of content, while also having to worry about compatibility issues with your theme or favorite page builder.
In this tutorial, we’re going to use TranslatePress, a beginner-friendly WordPress translation plugin, that lets you translate all your taxonomy slugs in one place, using an intuitive translation interface that looks like this:
It also works out of the box with any theme or plugin, including WooCommerce or page builders, like Elementor. Using it you can translate every content on your site, page by page, using a visual translation editor.
Let’s dive in…
Translating WordPress Categories, Custom Taxonomies & Terms using TranslatePress
WordPress taxonomies are useful for grouping things like blog posts or custom post types (events, books, movies etc.) together. Two popular taxonomies used on a regular basis are “Categories” and “Tags”. Users can add tags to their WordPress posts along with categories.
A custom taxonomy could be something like “Genre” for a “Movies” custom post type. In this case the “Genre” taxonomy terms might include: “Action”, “Romance”, “Thriller” and more. Obviously, the possibilities here are many for grouping your content.
TranslatePress makes it really easy to translate any taxonomy or term slug.
Using its URL Slug translation interface you can:
- Translate Taxonomy Slugs
- Translate Term Slugs
- Translate Post Slugs (this includes pages and custom post types)
- Translate Post Type Base Slugs
- Translate WooCommerce Slugs (shop base, product category, product tag)
In this tutorial, we’ll focus on the first two points, but for a complete guide on translating any URL slug in WordPress you can check out this tutorial.
Getting started with TranslatePress
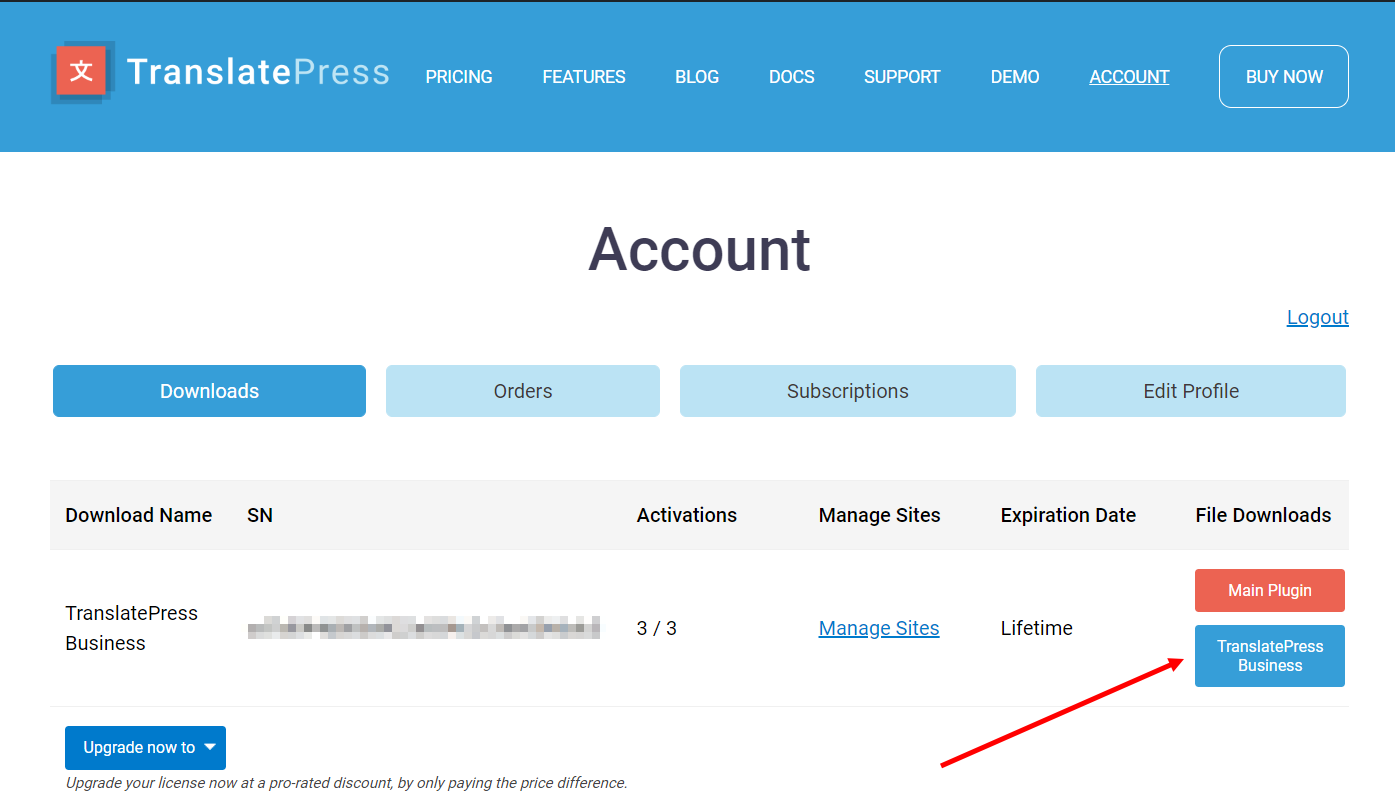
Installing TranslatePress on your website is a straightforward process. First, choose your preferred plan and purchase the premium version of the plugin. The reason you’ll need the pro version is because we’ll be using the SEO Pack add-on, available with any of the paid licenses.
So, after purchase, go to your account page and download your copy of the pro plugin.
If this is the first time you’re using TranslatePress, you’ll also have to download the main plugin and install both zip files on your site from the Plugins area.
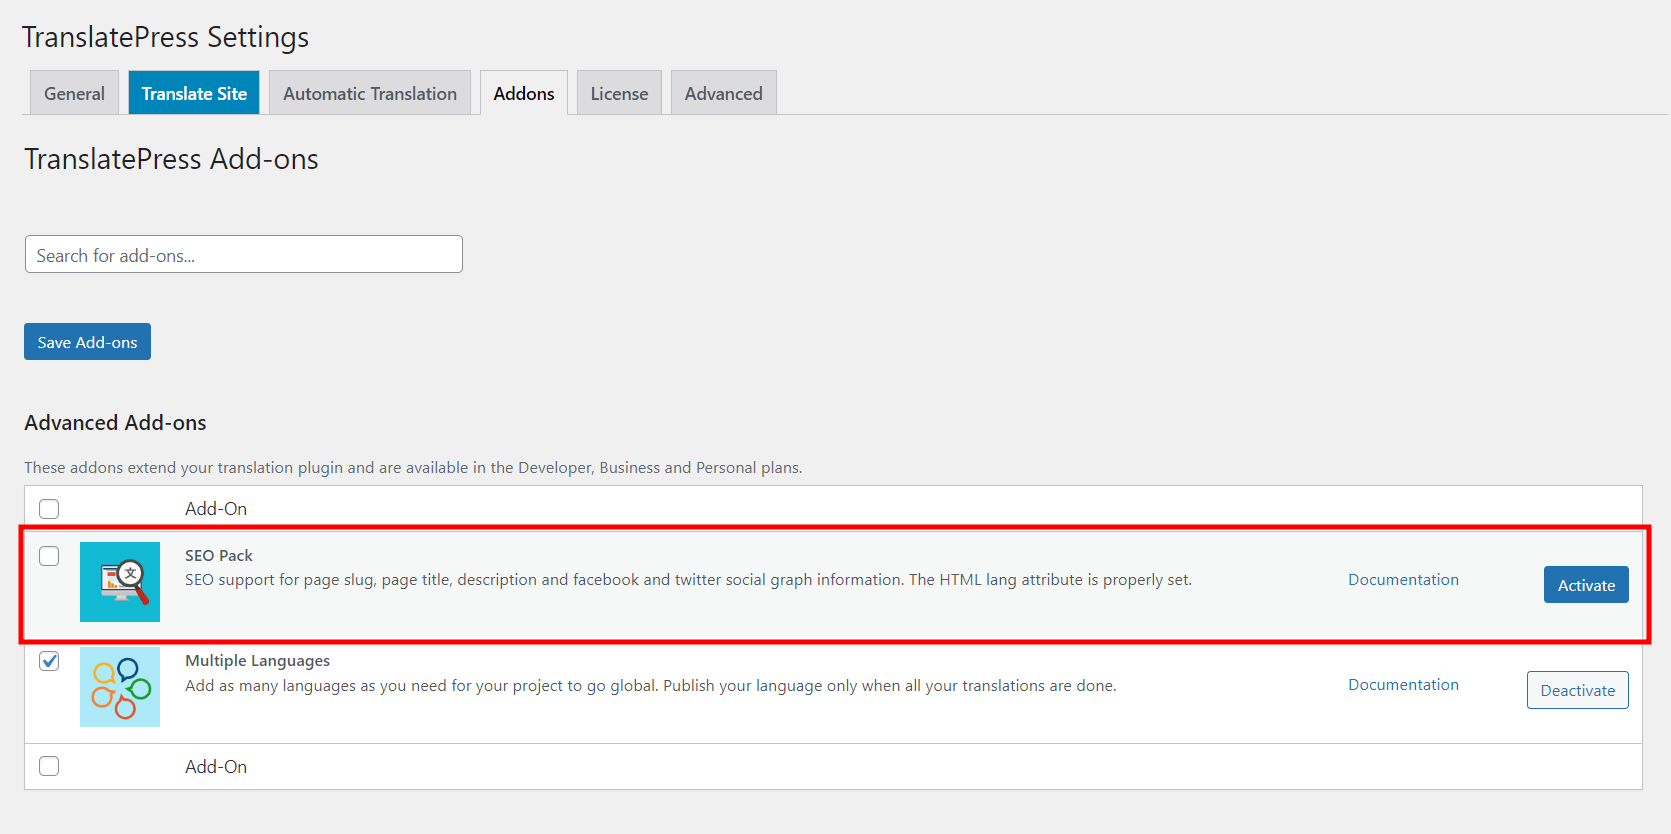
To translate categories, taxonomies, and terms, you’ll also need the SEO Pack add-on (included in any TranslatePress premium version). You can activate it from the Addons tab in the TranslatePress Settings.
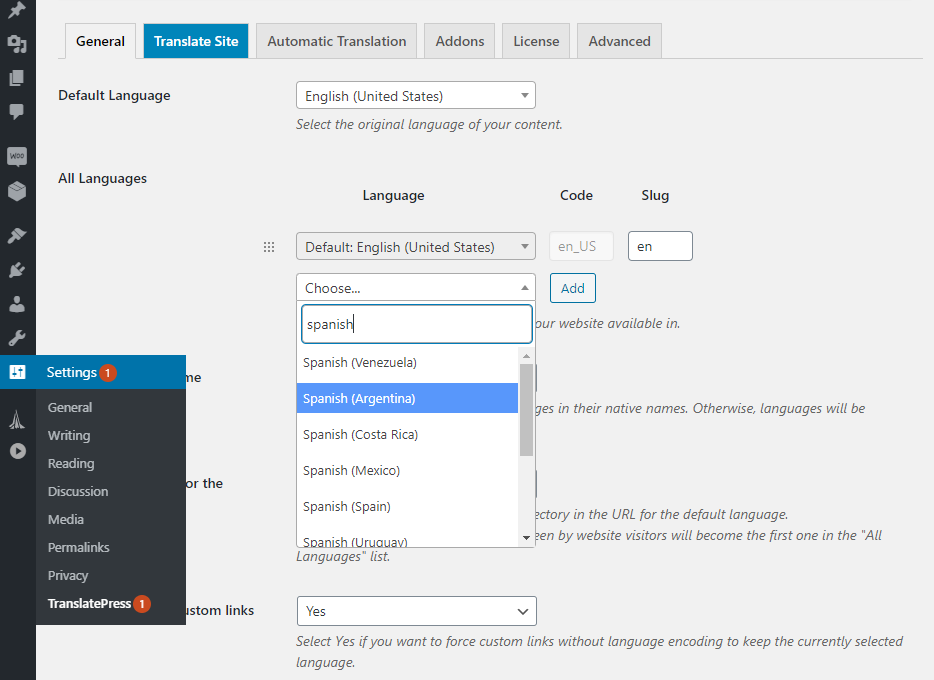
Next, under TranslatePress Settings make sure to add a translation language you wish to make your site available into. We’ll pick “Spanish” for this example. The setting page also contains options like customizing your language switcher, but we’ll leave them set to default for now.
Make sure to save the settings and then click Translate Site.
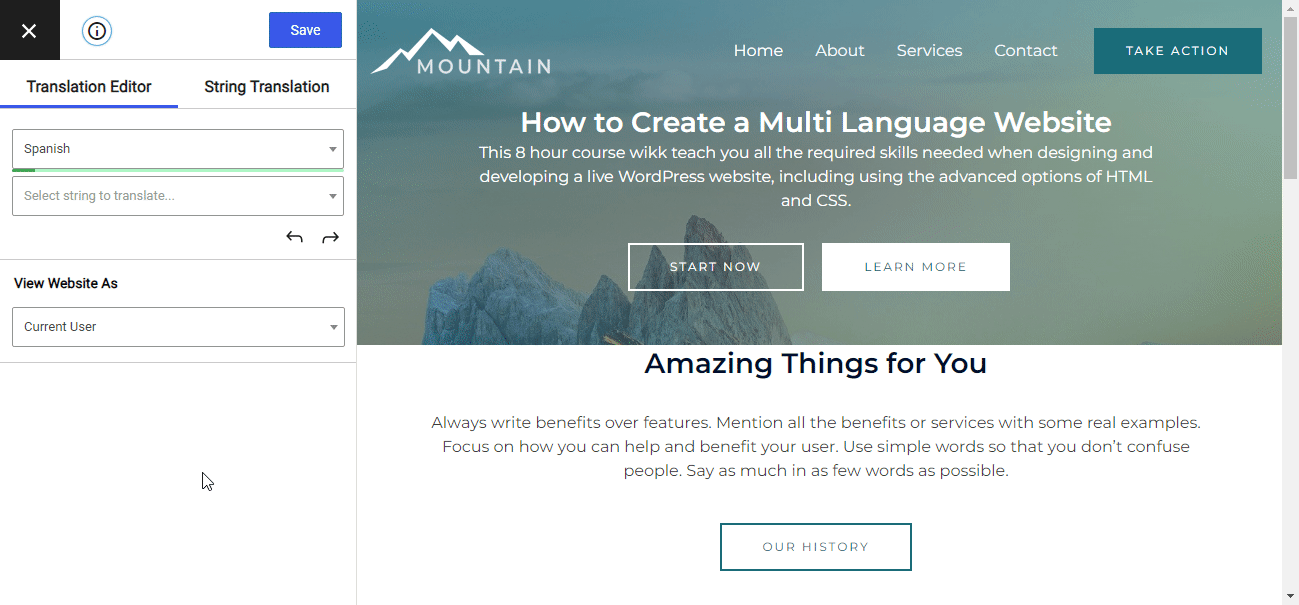
You’ll be prompted with a visual translation editor (similar to the Customizer) where you simply click to select a certain text, then enter its translation in the left sidebar. Hit Save and you’ve just translated your first piece of text. Simply repeat the same process for every string on the page and you’ll have all your content translated.
To speed things up you can use automatic translation (TranslatePress integrates both Google Translate and DeepL machine translation services) and after simply modify what hasn’t been translated properly.
Now that you’ve seen how TranslatePress visual translation interface works, let’s start translating our taxonomies and terms.
Translating WordPress Category or Custom Taxonomy Name
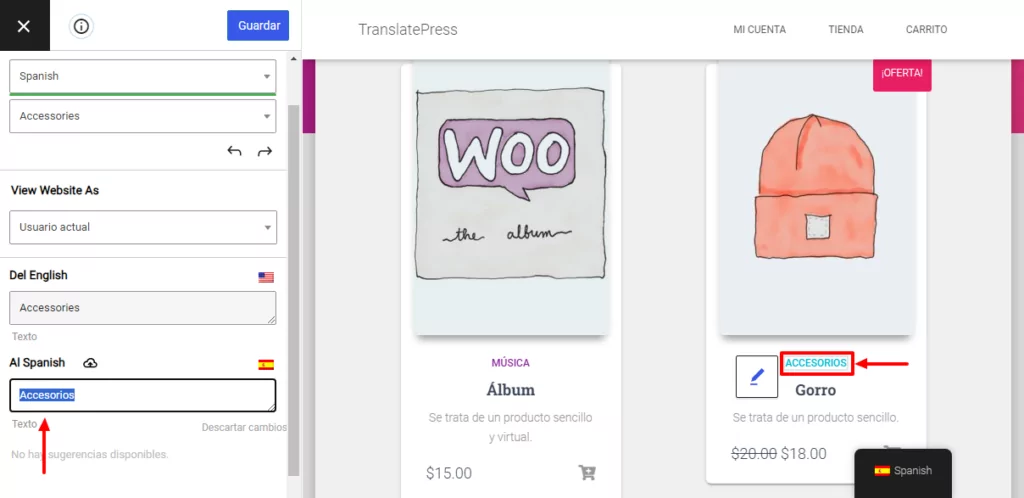
Using the visual translation interface from TranslatePress simply navigate to the page where the taxonomy name appears, click the pencil icon to select the text, then enter its corresponding translation.
After you’ve translated a taxonomy name once, it will automatically change all over the site, showing the corresponding translation. So you only need to translate any taxonomy or term once.
Besides the actual name, another important thing that we need to translate is the taxonomy and term slug.
Translating WordPress Taxonomy Slugs
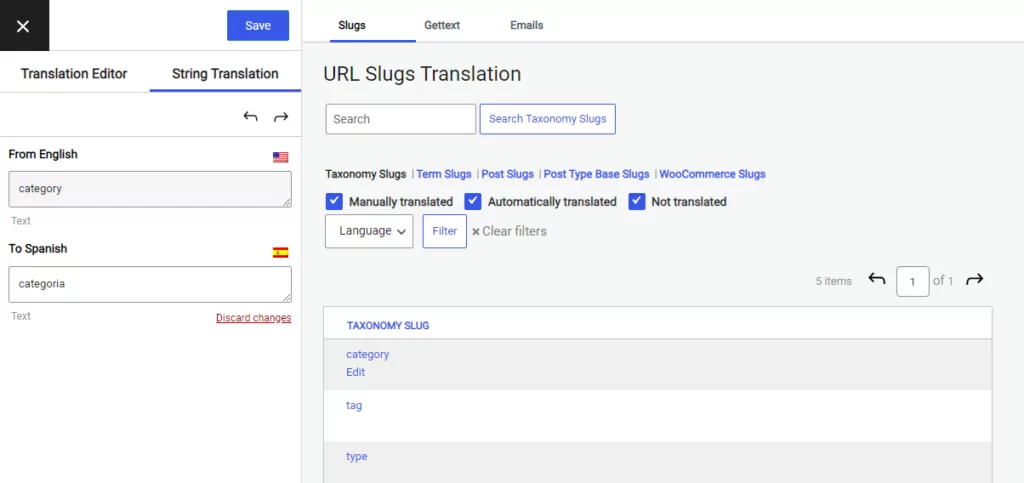
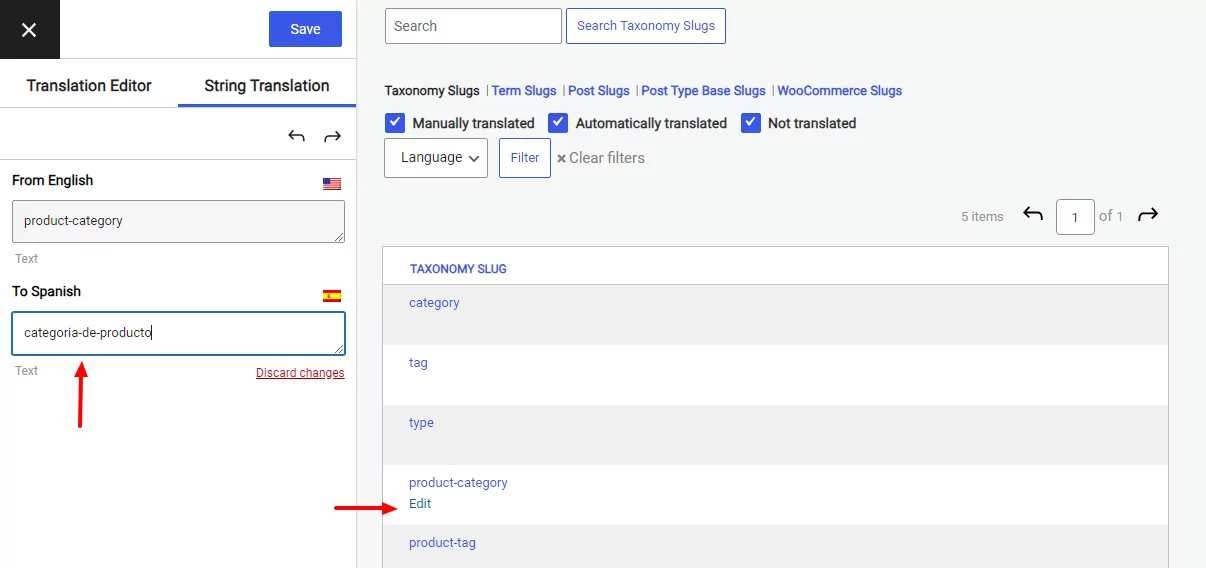
The best way to translate all taxonomy and term slugs from one place is to switch from the Visual Editor to the String Translation tab (lower left).
Here you can select the type of URL slugs you’re looking to translate using the mini tabs, as well as filter and search for specific ones.

We’ll select the “Taxonomy Slugs” tab and translate each taxonomy into Spanish. As you notice, the first one is the default WordPress taxonomy: “category“. Simply click on it, enter its translation, hit Save, and move to the next taxonomy.
Translate WooCommerce Product Category & Tag
Using this interface you can also translate WooCommerce product categories, as well as product tags. We’ll go ahead and translate “product-category” taxonomy into Spanish.
You can translate any type of category (including custom ones) from TranslatePress’ URL String translation interface.
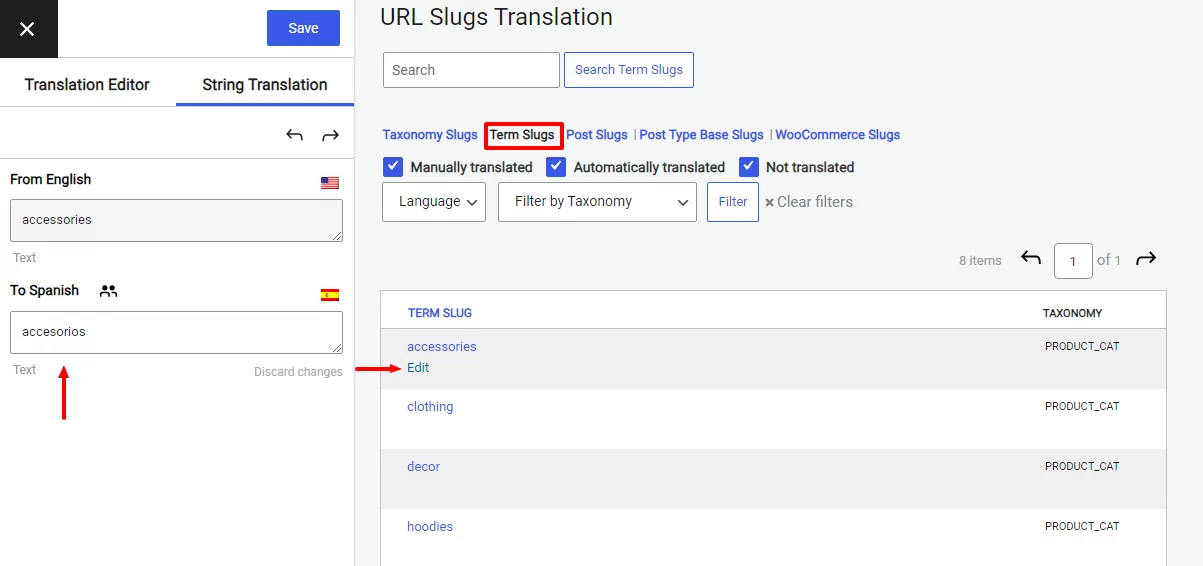
Translating WordPress Term Slugs
Now that we translated all taxonomies, we can proceed to translate term slugs. Clicking on the Term Slugs tab will list all the terms. The interface will also show you the corresponding taxonomy for that specific term.
Translating any term slug is done exactly the same way. You select a term, enter its Spanish translation in the translation sidebar and click “Save“.
Once you’re done translating everything, simply close the URL Slug Translation interface and browse the front-end of your website in Spanish. You’ll notice that all taxonomies and term slugs have been properly translated.
Start Translating WordPress Taxonomies with TranslatePress
Using TranslatePress along with its <a href="http://SEO Pack add-on you can translate WordPress taxonomies and terms all in one place, using a familiar interface.
You start by translating the actual name of each taxonomy and term, then using the String translation interface you’ll be able to translate their URL slugs as well.
The URL Slug translation lets you translate all slugs (posts, pages, CPTs, WooCommerce products), including taxonomies and terms. You can easily browse, filter, and search for certain slugs. You’ll have all slug translations in one place so that you won’t leave anything out and make sure everything is properly translated.
TranslatePress Multilingual
TranslatePress is the easiest way to translate your WordPress site. It's fast, won't slow down your website, works with ANY theme or plugin and it's SEO friendly.
Get the pluginDo you still have questions about translating categories and taxonomies in WordPress? Let us know in the comments!
If you found this post helpful, please check out our YouTube channel, where we constantly upload short & easy-to-follow video tutorials. You can also follow us on Facebook and Twitter to be the first to know each time we post.